

We were recently planning a trip to the beach with some of our friends (A couple we are friends with, their 2 kids, plus our family of 4 had rented a house at the beach for a week). One afternoon about a week before our trip, my friend was talking about this beach canopy she really wanted to order for the beach, but couldn’t justify spending $300 on it, since it would only be used at the beach since it needed wind to stay up.
That same afternoon when I got home, my husband said, “Hey, let me show you a picture of something, I want you to sew for our beach trip!” Sure enough, it was the exact style of sunshade my friend was describing.
I knew I could sew it easily, and did some quick searching for supplies to calculate what it would cost to make. After locating supplies I could source locally or with Amazon Prime (our trip was less than a week away), I calculated I could make 2 canopies (one for my family and one for my friends) for just under $60 each. I ordered my supplies and got to work assembling them!
Supplies needed:
8 yards of Ripstop Nylon (if doing 2 different colors, 4 yards of each)
Tools needed:
Sewing machine
Scissors or Rotary Cutter
Fabric
My local Joann Fabric store had Ripstop Nylon for $7.99 a yard, but there was also a 50% off coupon for a single cut of regular-priced fabric, bringing the fabric down to $3.99 a yard, or $31.96 for the 8 yards needed per canopy. I was making 2 canopies, so I purchased 8 yards of yellow Ripstop Nylon and 8.5 yards of orange (I needed approximately a quarter of a yard extra for each canopy to make a carrying bag for the sunshades, but this is optional if you have something else to store and carry your canopy in). While in Joann Fabrics, I also picked up some outdoor thread.
Fabric Prep
Ripstop Nylon has a raw frayed bias edge. The first thing I did, to prep the fabric, was to trim off these raw edges with my Rotary Cutter.

Sewing the Canopy
Attaching the 2 Different Colored Fabrics
Once I trimmed off the raw bias, I put both pieces of fabric on top of each with "right" sides facing (the side of the fabric that I wanted to show on the outside of the canopy). With a half-inch seam allowance, I added a straight line of stitching that ran the full 4-yard length of both fabrics.

After Stitching the 2 colors together and unfolding them, I was left with a large rectangle 4 yards wide by 117 inches long (each fabric was on a 59-inch bolt, less the half-inch seam allowance).

Heming the back and sides
I decided I wanted orange to be the front of my canopy and yellow to be the backside. I needed to hem the back of the canopy as well as the 2 sides.
I folded my fabric over and sewed a 3/8th inch seam allowance on the back (yellow) and both sides (half yellow/half orange). I only folded my fabric once, but after using these all week at the beach, there is a small amount of fraying, so I will go back and double-fold them to enclose the raw edge. I recommend doing this from the get-go if you are making one.

Creating the Tent Pole Pocket
After hemming the back and sides, I needed to make a pocket to hold the tent pole along the front of the canopy. To do this, I folded the orange (front edge) fabric over 1.5 inches and ran a straight line of stitching 1 inch away from the folded edge. This left a pocket to run the tent pole through.
Attaching Velcro to Canopy
I knew the strong wind on the beach could cause the canopy to slide around on the poles, so I added some Hook and Loop Velcro to the fabric and the poles, to keep the canopy in place. I used an 8-inch velcro length applied to both sides of the canopy right behind the tent pole pocket.

This velcro was "no sew" and had an adhesive, but I decided to sew it on to ensure it stayed secure in the wind. I removed the paper backing from the hook (softer) side of the velcro and stuck 1 end of the 8-inch piece of velcro to the front of the canopy and 1 end to the back. The velcro was now folded in half, with the sticky sides stuck together (leaving a 4-inch piece that overhung each side of the canopy).

I stitched a square and X on the velcro to make sure it stayed secured to the fabric. I packed the 8-inch pieces of loop (rougher) Velcro to take to the beach and just wrapped it around the tent pole and stuck it to the poll with its own adhesive once I had the canopy set up and saw where the velcro needed to be.

Creating Hole for Rope and Anchor
The final step to make the canopy, was to add a hole in the center of the front for the rope to go through. I had originally planned to add a grommet but realized the grommets I had on hand were a little too small for the rope.
Instead of buying new grommets and a new grommet tool, I decided to just sew a buttonhole to put the rope through. I used my sewing machine to make a 1-inch buttonhole directly behind the pole pocket at the center point of the canopy.

Setting up the Canopy on the Beach
The first time we used this at the beach, the setup took a couple of minutes (still faster than most other shades we have used in the past and it was definitely much much lighter to carry). All future days took under a minute to set up since the fabric canopy was already on the pole with ropes and velcro already attached.
Assembling Tent Pole and Installing Loop Velcro
To set up this sun shade, first connect all segments of the tent pole together to make one long piece. Slide the tent pole through the pocket on the front of the canopy. Place both ends of the tent poles into the sand, spread out the canopy on the tent pole.
For the first use, you will want to add the loop velcro to the tent pole at both ends of the canopy so you can attach the hook velcro pieces that are sewn onto the fabric and keep the canopy from shifting in the wind. I just removed the sticky backing and wrapped the velcro around the pole. Make sure you are only sticking the velcro to a single black segment of the tent pole, and don't overlap the connector pieces, or you won't be able to fully fold down your tent pole later.

Attaching Rope and Anchor
Finally, I added rope through the buttonhole in the center of the canopy, stretched the rope forward, and wrapped it around the Beach Tent Anchor that I placed into the sand several feet in front of the canopy.

Breaking Down Canopy
At the end of each beach day, we removed the anchor from the sand, separated the velcro, pushed the canopy to the center of the pole (where it was all on a single segment of the tent poles), folded the tent poles back down, and wrapped the fabric around the tent poles before sliding it all into a carrying bag. It was so very fast and simple to break down and then set back up. We could do either in under a minute!
Advantages to this style Canopy
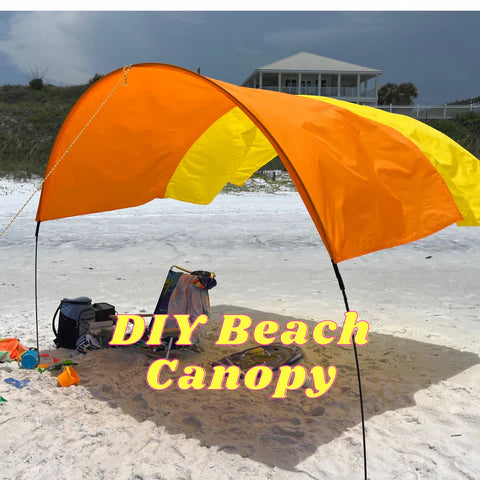
All the adults on our trip agreed it was the best canopy/sunshade/umbrella we have ever used on the beach. The dads who had to carry all our gear down loved how lightweight it was and how quick it was to set up. The moms loved the shade it provided all day, and that we didn't have to fight it once, it never fell or had to be adjusted because the wind got too strong (like the umbrellas we used to use). We spent 8+ hours on the beach every day and the only adjustment I ever had to make was moving my chair back a couple feet to stay in the shade when the sun changed position later in the day.
Obviously, the biggest perk to making my own was the savings. It cost a fraction of the price of many similar products. The perk I didn't think about at the time of making it, was the ability to select my own colors. There were a lot of blue canopies on the beach, but it was super easy to spot our location at any time by looking for our orange and yellow canopies!

We loved using this all week on the beach in 30a (Seagrove, Florida). I will be packing it for our next trip to Grand Cayman as well! Normally we don't take any tents or covers to the Cayman Islands because they are too bulky on the airplane, but this will be no trouble at all to pack!
Lastly, if you are headed to the beach, be sure to pick up this Surfer Dude Toy, my friend bought one and brought it on our trip. Wow is it cool! It kept the kids and random adults walking down the beach fascinated for hours! You throw it into the ocean, and it surfs back to you every time!
The adults would really launch it far out, and then here he would come surfing back! The toy comes with a guarantee if he doesn't make it back to shore, but we threw it in thousands of times and he always came back! It was soooo much fun! Several times I would be relaxing under the shade and reading a book, if the kids came in asking to do something else, all we had to do was tell them to go play with their surfer toy!
**I have included affiliate links to the products I used and can receive a small commission if a purchase is made after you click on a link in this tutorial. All items used in this tutorial were purchased by me and I did not receive anything in exchange.
MagpieTayleetot is a participant in the
Amazon Services LLC Associates
Program, an affiliate advertising
program designed to provide a means
for sites to earn advertising fees by
advertising and linking to Amazon.com

5 comments
Thanks for the DIY … SUPERLATIVE !!!!
I just have a question. Does the back end with no support basically stay “up” because of the wind or does it sometimes collapse down? I guess there is ALWAYS wind at the beach. Tell me if you can what you have experienced with that design. Thank you so much
This is a great tutorial with a lot of details, thank you.
Question, how did it do under the shade? Does ripstop have an UPF rating? I want to make one for the family, but would need something with a UPF value of 50+.
Thank you! I followed your tutorial and made one of my own! I knew it had to be pretty straightforward to sew, but am grateful you did the research and put it all out there for me to use.
I’ve been thinking about doing this. How did it hold up?