I recently planned a graduation party for my oldest daughter who didn’t want traditional black or her school colors (red/black/white) used for party decor. Something lighter and prettier definitely suited her personality more. I was searching for alternate graduation party decorations that didn’t involve black when I came across this cute Groovy Grad set from Big Dot of Happiness. I instantly knew this would be the perfect theme for her graduation party! The colors were perfect and she absolutely loves 70s music and culture. I ordered this set immediately and used it as inspiration for the rest of the party. 
I originally planned to do a large balloon garland in the same color scheme. One of the last parties I threw at our house, was a Mardi Gras bash for all of our neighborhood friends. I made this massive balloon garland with over 700 balloons for the Mardi Gras party, and planned to add balloons to the same tall columns in my living room again but with these groovy grad colors.

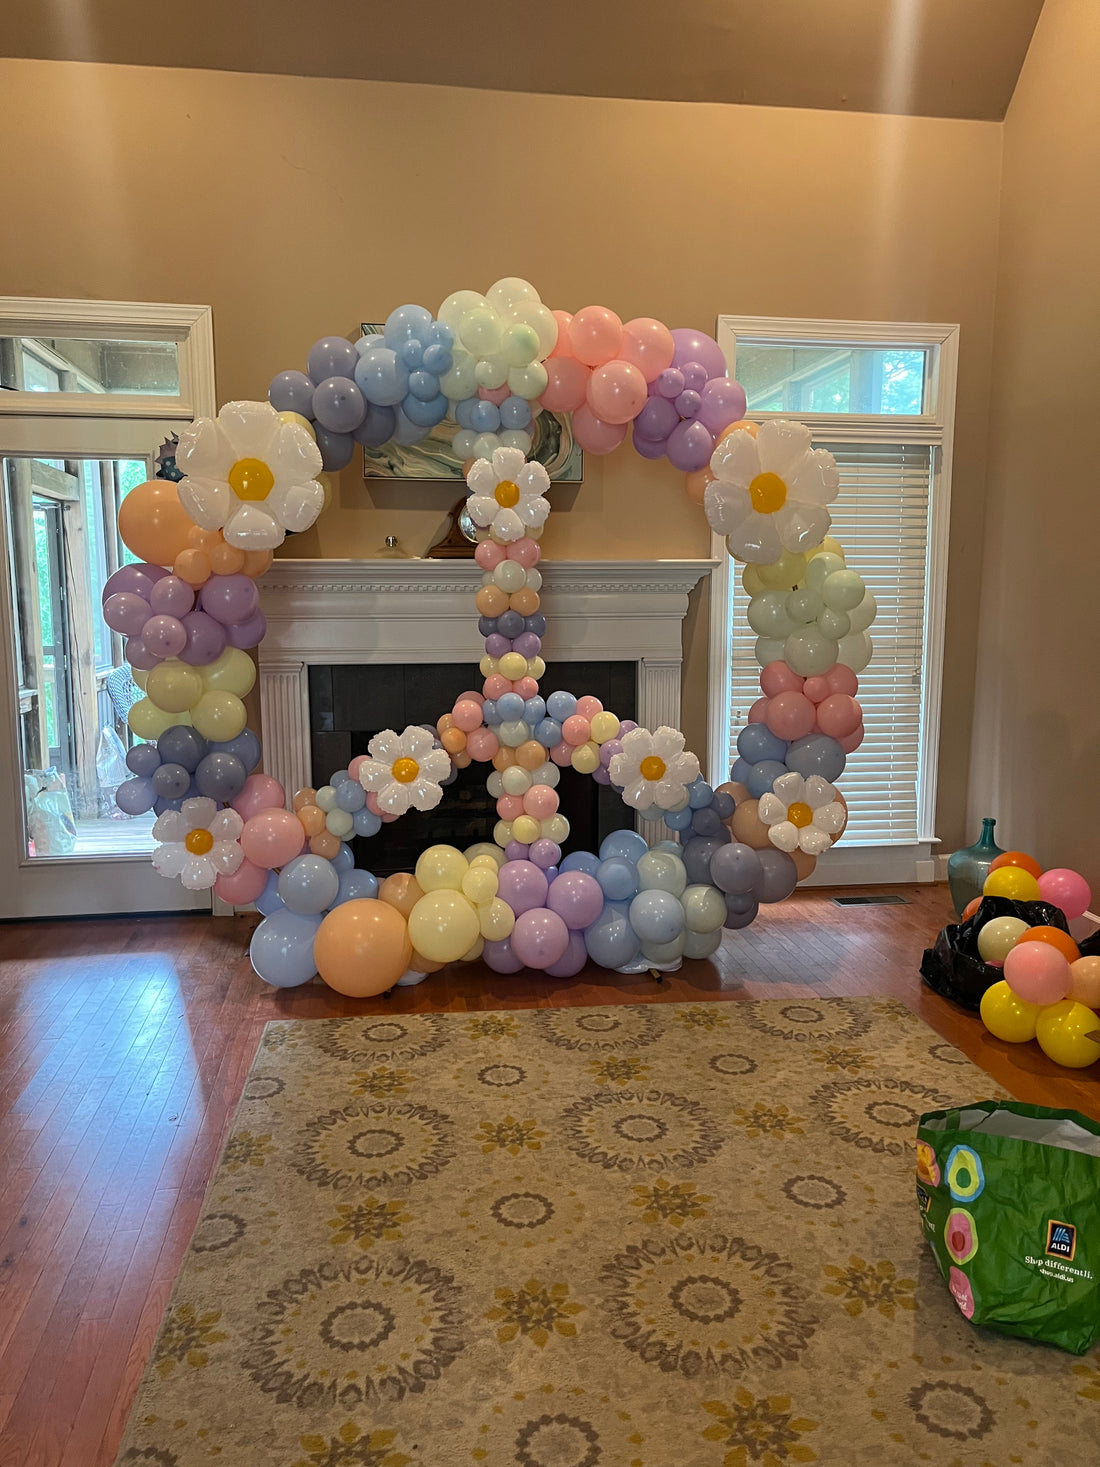
The more I thought about it, I decided I should mix things up a bit, and started looking for other ideas for a large statement piece made from balloons that would match the parties theme. I stumbled across some pictures of giant peace signs made from balloons, and knew it would be the perfect center point for the party!
In order to make the giant peace sign, I would first need a large Round Balloon Arch Frame. I’ve seen these used in many different ways for parties. I knew I’d find a way to use it again for future parties, or could easily sell it afterwards in my local moms resell group.
Next I needed balloons in the parties color scheme (5-7 different colors) in at least 2 sizes (small for the inside of the peace sign, and larger for the outer ring), I also loved the idea of adding some flowers to the peace sign. Buying lots of balloons in that many colors and sizes can get expensive quickly, even when you are doing all the work yourself. I’ve ordered balloons several times from Temu and have been very happy with the quality and price! You can save 50% off your first order on Temu, which really makes their balloons a steal! The package ships from overseas but I have received all of my orders in under a week! Initially I was searching for balloons in the parties color scheme but eventually came across these Daisy Balloon Garland Kits that had all the colors and sizes I needed already bundled together and it included some Daisy balloons in 2 sizes I could add to the peace sign. I did some rough calculations to determine how many balloons I would need to make the peace sign, and ordered 3 of the Daisy Balloon Garland Kits.
Supplies needed to assemble peace sign:
Balloon Pump I recommend a dual nozzle balloon pump, there is no way you can blow up this many balloons with your mouth!
144 - 5 inch balloons for inside of peace sign plus extras as fillers for outer ring
138 - large balloons (I used a mix of 10, 12, and 18 inch balloons) plus extras as filler.
Optional - Daisy Balloons
18 260 balloons (color doesn’t matter, these won’t be visable)
Packing tape
I like to inflate and prep my balloons a few days in advance to minimize assembly time the day of the party. I go ahead and make small clusters and store the balloons in Balloon Bags until it’s time for final assembly.
For this peace sign balloon garland, I started by inflating the balloons for the outer ring. I use my balloon pump to inflate 2 balloons of the same color at a time and then tie those balloons together to close them (this is much easier to tie and doesn’t hurt my fingers like tying a single balloon, plus it’s twice as fast!)
I repeat this process 2 more times with balloons of the same color until I have 3 sets of 2 balloons. I overlap 2 sets at the knots, and then twist together 2 balloons from opposite pairs a couple of times to secure them together. I then repeat with the third pair of balloons, I overlap the knot of the last pair with the knots for the four balloons that are secured together and twist one of the balloons from the pair with one of the balloons from the quad until all 6 balloons are attached.
I repeated this process with all colors in the larger balloon size until I had 23 clusters of 6 balloons. I stored these clusters in bags for a couple days until the day of the party. After making all the clusters for the outer ring of the peace sign, I started inflating the 5 inch balloons for the inside lines of the peace sign.
I inflated 2 five inch balloons, of the same color, at a time using my electric dual nozzle pump and tied their necks together. I then tied two more balloons in the same color together. Once I had 2 sets of 2 balloons, I overlapped the knots and twisted the balloons around each other until all 4 balloons were interlocked. I repeated this process until I had 36 quads of five inch balloons, and then I made small column sections to add during final assembly.
I used 260 balloons to assemble small sections of columns with the five inch balloon quads. I would take one five inch ballon quad and tie one end of the 260 balloon to the knot in the center.
Using both hands I would flatten the quad so all 4 balloons were sitting flat and even with each other. I would flatten the next quad I wanted to add and sit them on top of each other. I took the excess length of the 260 balloon and wrapped it around the second quad in a figure 8 between 2 of the balloons. Without letting go of the 260 balloon, I would add another quad below and repeat the figure 8.
I would continue doing this, stacking each on top of each other until I was running out of length on the 260 balloon (approximately 8 quads stacked together). As I reached the end of the 260 balloon, I would tie the remaining end of the 260 to the knot on the final quad securing the column. I made four of these columns and then stored them in bags until I was ready for final assembly.
The day of the party, I set up the Round Balloon Arch Frame and added the water balloon weights, that were included with the frame, to the feet of the frame.
Next, I made the outline for the lines inside the peace sign. To do this, I used 4 more 260 balloons. I tied one 260 balloon to the center of the frame at the top, and a second 260 balloon to the frame in the center of the bottom. I stretched the 260 balloons to meet in the center of the circle and knotted them together.
I tied two more 260 balloons to this knot in the center of the circle and stretched each out towards the lower right and left sides of the frame until it looked like a peace sign and then I knotted the loose end of the 260 balloon to the frame. 
After establishing the outline for the peace sign with 260 balloons, I begin adding the clusters of 6 balloons around the outer ring of the balloon frame. I would just slide the bar between at least 2 balloons and twist the balloons around themselves to secure the balloons to the frame. I repeated this process until the outer ring was complete.
The columns were already made for the inner lines, to attach them I just pushed the columns onto the 260 balloons that were tied to the frame making sure the 260 went between 2 balloons of each color.

The balloons now looked like a peace sign, to give it a little more dimension and fill any gaps, I made some extra clusters of 3-4 small 5 inch balloons. To attach these small clusters around the outer ring, I wrapped a rubber band around the center of the cluster and stretched the rubber band over a balloon where I wanted to attach it.
Finally, I added some of the daisy balloons that were included in my balloon arch kits. To attach the Daisy balloons, I used clear packaging tape to tape a 260 balloon to the back of each Daisy balloon. I held the flower in place, stretched the 260 balloon around the other balloons and tied it in the back.

The completed peace sign balloon garland made a great statement piece for the party, and was a fun spot for everyone to hold up the groovy grad Photo Booth props for pictures!

I did make 1 more photo booth for her party (I can’t help myself, I love a good photo op). I found this cute VW bus Photo Booth backdrop and already had a Backdrop Stand, so I hung it up and added another simple balloon arch around the outside.

Stay tuned for more groovy party ideas I used for her party! Have you done anything else cute with the round balloon frame? I’m brainstorming ideas for future parties!
**I have included affiliate links to the products I used and can receive a small commission if a purchase is made after you click on a link in this tutorial. All items used in this tutorial were purchased by me and I did not receive anything in exchange.
MagpieTayleetot is a participant in the
Amazon Services LLC Associates
Program, an affiliate advertising
program designed to provide a means
for sites to earn advertising fees by
advertising and linking to Amazon.com