

Every Halloween my neighborhood hosts an adults only Halloween party with cash prizes for the best Halloween costumes. I had won the contest in 2020 and knew if I wanted to win back to back years I would have to really step up my game!
I pride myself on making my own costumes and thankfully started planning in September because this costume took a long time but I was so happy with the results!
I'm a bit obsessed with the 1700s! I've always been fascinated with the American Revolution, Catherine the Great, and of course Marie Antoinette. I decided I wanted to be Marie Antoinette for Halloween but didn't think my neighbors would have enough appreciation for just a really fantastic period costume.
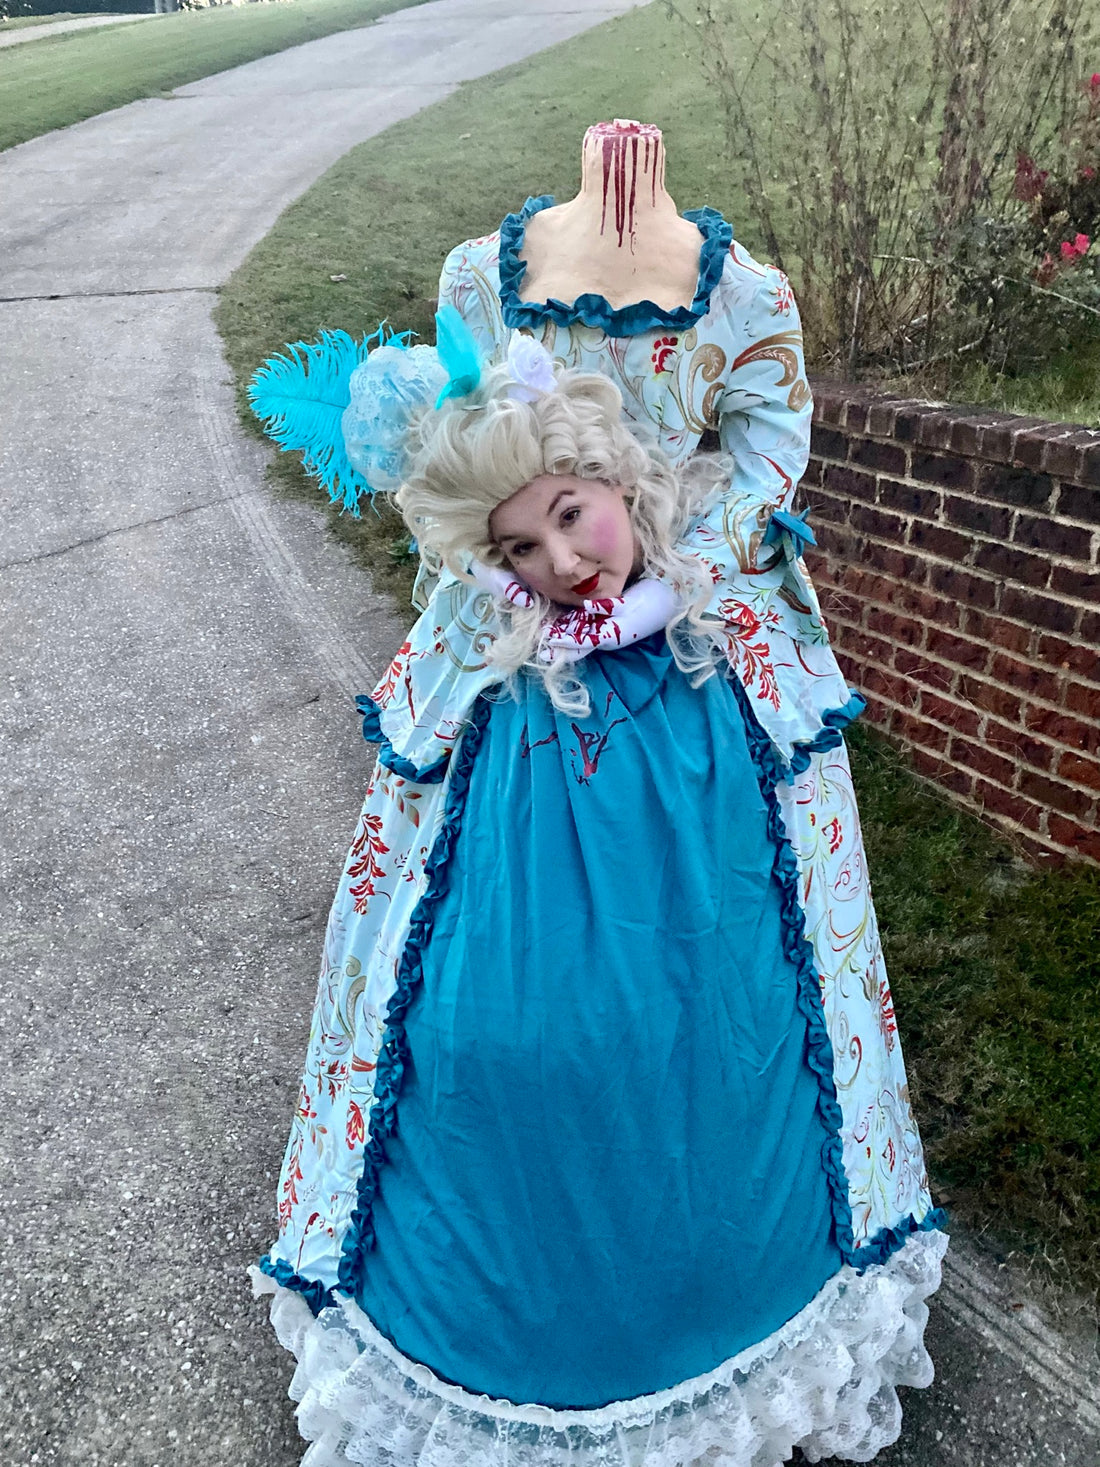
I've also always been partial to illusion costumes, so I decided I wanted to be Marie Antoinette after her head was chopped off! When I searched the internet for ideas I found most of the "headless Marie Antoinette" costumes were more headless "corpse bride" than Marie Antoinette.
I wanted a dress that was more historically accurate and of course a fancy Marie Antoinette hairstyle! I preferred to look like her head had just been chopped off seconds before and wasn't already in a zombie state.

When planning the costume I knew I would need the following basic components:
1. Dress
2. A fake bust
3. A rig to hold the bust up right
4. Fake hands to hold my head
5. Wig (since I have brown hair and didn't want to dye it and style it)
The Dress
I started my planning with the dress since it was important to me to have the dress look at least remotely period accurate. I knew if I was going to sew the dress, it would take a while.
I had originally planned to sew the dress since I am a pretty good seamstress. After looking at patterns and fabric options, I realized it would not only be very time-consuming but also very expensive to achieve the look I was going for.
I did a little looking and found this dress on Amazon for a lot less than I would have spent on materials to make a dress from scratch and I would save myself all the time I would have spent sewing it from scratch. Here is the Victorian Dress I started with.

I just ordered the largest size they had since I wasn't worried about it fitting me and wanted it as long as possible to hide my legs and create the look I was going for.
When it arrived and I positioned myself inside the dress with my head roughly at the waist seam (this is where I estimated my head would go once the costume was finished I realized I would still need about 8 inches of length in the front to achieve the look I wanted and to hide my feet.
I went ahead and picked up some cheap blue muslin fabric (that matched as close as possible) and 5 yards of cream lace that I would use later to finish the dress. I put the dress aside for the time being and got to work on the fake bust.
The Bust
For the fake bust I wanted it to be lightweight (because I would be wearing it on my back all night) but sturdy (so I wouldn't have to worry about damaging it when putting it on or dancing).
I decided to go with a brown paper bag paper mâché. To get the shape for the bust I used a child-sized dress form I already had. I needed the shoulders to be more broad and it would need breasts.
To widen the shoulders and make it more adult sized I used a couple of car wash sponges duct taped to the sides and to start the breast shapes I duct taped a couple of painting masks to the chest.
I then covered the entire dress form in saran wrap and took strips of duct tape and overlapped them all over the saran wrap. If you don't have a dress form at home this process can be done by putting a cheap t-shirt on yourself and having a partner cover the t-shirt you are wearing in duct tape. I probably would have taken that route but didn't want my husband or kids to have to help me cover myself and by using the dress form I could work alone.
Once the full dress form (or t-shirt on your body) is completely covered with a couple layers of duct tape cut a straight line up the center of the back and remove the tape from the dress form (or your body). Use a new piece of duct tape to re-tape the cut line closed.
You really want the fake bust to stop a couple of inches below the breast. If your tape is longer than that, go ahead and trim it to size now. Once it was roughly the size I wanted, I filled the bust tightly with polyfill and put another car wash sponge at the bottom of the bust (this sponge is helpful when attaching the rig later).
I used some more duct tape to cover the openings at the arms and on the bottom (I left the neck hole open and filled mostly to the top with polyfill). The bust was now ready for paper mache!
Paper Mache
I decided to make my paper mache from brown paper bags because it is more sturdy and requires fewer layers. This process takes a lot of time and can't be rushed!
I grabbed a few brown paper bags (left over from grocery shopping) and relaxed in front of a movie (I decided it was the perfect time to watch the Kirstin Dunst Marie Antoinette movie, but feel free to catch up on any show you'd like while doing this part). You have to really soften the fibers in the brown paper bags, so I tore the bags into large pieces and wadded them up into balls, unwrapped the balls, and repeated over and over and over until they were soft, then I tore them into small 1 inch squares.
I made a simple paper mache glue by mixing 1 cup flour with 1.5 cups warm water (don't premix too much at a time, because you need fresh glue for each layer). With a cheap paint brush I brushed on some glue to my paper squares and applied a single layer all over the duct taped bust.
I let this layer dry overnight. And repeated for several days, adding a single layer and letting it dry fully overnight. Once I had 5 layers I realized I was getting close to finished but the breasts weren’t large enough to hold up the dress.
To fix this I blew up a small balloon and applied paper mache on all sides of the balloon, let it dry overnight, and repeated until I had 3 layers. Once the final layer was dry, I used a serrated knife to cut the sphere in half. I used a little wood glue to attach each half of the sphere over the existing breasts and then added a final layer of paper mache over the entire bust to seal them down!
After the final layer dried, my paper mache wasn’t as smooth as I would have liked so I added a thin layer of wood putty over the area that would show (the neck and upper chest) and then sanded it smooth once it dried.
I wiped off the dust and then painted the bust with flesh toned acrylic paint. The final step to finishing the bust was creating the bloody severed neck. I took toilet paper, wadded it up into small balls, and dipped them in liquid latex (Here is the KANGAROO Professional Grade Liquid Latex Makeup, 16 Oz Pint) I used) and stuffed them into the neck cavity.
I added a white cap off an old cleaning product bottle in the center to look like the spine. Once the liquid latex dried (about 20 minutes) I poured nail polish all over the top (I used 2 different shades of red from the dollar tree and just let them blend together on their own which created a look of different muscles and tendons combined with the texture from the liquid latex). I used the darkest red and let it drip over the edges and down the neck. The fake bust was finally complete! 
I set it aside and started working on the rig that would hold the bust in place.
The Rig
When building the rig, just like the bust, I wanted something lightweight but didn’t want to worry about it breaking when putting the costume on or during the party. I ultimately decided to use Bamboo sticks to make my rig. I found a large package of Bamboo sticks at Lowes, ordered them online for a few dollars, and picked them up in-store (so I didn’t have to locate them in store myself).
The other thing I needed for my rig was a backpack, I just used an old beat up one that belonged to my youngest daughter. I wanted the bust to sit directly above my head, and the bottom of the rig needed to sit in the bottom of the backpack.
With the backpack on my back, I measured from the bottom of the bag to the top of my head and then added 5 inches. This would allow the rig to go inside the bust by about 4 inches and have an inch of clearance above my head.
I had my husband use his power saw to cut 4 bamboo sticks to this height and asked for a bunch of smaller pieces that were 4-8 inches each. Using a combination of wood glue and hot glue (the hot glue bonds instantly and the wood glue provides a stronger long-term hold once dry) I built 2 ladder pieces and then attached them to each other with the smaller pieces he cut (the 8 inch pieces worked as steps and braces between each side of the ladder and the 4 inch pieces helped connect the 2 ladders to each other).
I drilled 4 holes through the duct tape and giant sponge in the bottom of the bust, filled the holes with e6000 glue Eclectic 570110, Clear 0.9 Fl Oz E6000+Plus Multipurpose Adhesive-0.9oz, 0.9 oz 9, and hot glue then inserted the 4 bamboo sticks. I used more duct tape to secure the sticks to each other and to the bust (this didn’t have to be pretty, no one can see it and I wanted to know it would be strong).
I then put the bottom of the sticks into the backpack (the front of the bust should be facing the back of the backpack/the side with the straps). I duct taped the sticks to the inside of the backpack, added a little polyfil between the sticks, and the wrapped duct tape tightly around the entire backpack (leaving the straps free). 
Once I was sure the rig was sturdy in the backpack and the bust, I tried it on. You should put the backpack on as you would normally wear a backpack. When trying it on, the bottom of the bust should be just above your head.
I was ready to put the dress onto the bust and mark where the hole for my head would go. The dress I purchased had a corset back, so I slipped the dress onto the fake bust and tightened the corset until it fit decently (I will secure the dress to the bust later, but just needed a rough fit for now). I now went up under the skirt of the dress and put the backpack on.
Dress Alterations including hole for head
I needed to mark where my neck hit underneath the dress (for me this was about 2 inches above the seam at the waist in the dress). Have someone help cut a slit in this spot, or mark it, take the rig off, cut the slit, and then try it back on.
Start small with your cut, you can always make it bigger but if you cut it too large it’s hard to un-do! You want the slit to be as small as possible while allowing you to fit your own head through the hole. With my head through the hole, I could now make the final determination on the length for the dress.
The dress I purchased had a long train in the back. While I loved the look of the train, I knew it was an accident waiting to happen at our Halloween party. If someone accidentally stepped on the train it would apply pressure to the rig and could pull the whole bust down, so the train had to go! 
I marked where I wanted to cut and hem the dress in the back (just floor length and no longer), and measured how much length I needed to add to the front to keep the dress floor length in the front as well (I needed about 8 inches).
I then took the rig off and removed the dress from the bust. I sewed a piece of blue bias tape around the hole I cut for my head to keep the cotton fabric from fraying later especially when taking my head in and out.

I cut and hemmed the back of the dress (I saved the extra fabric from the train and found a great use for it later…I will tell you about it below).
I then took a piece of blue muslin fabric that was close in color to the blue on the dress. With the dress laying flat I placed the fabric inside the dress and marked roughly what the piece needed to look like to fill the void on the front and make the front length the same as the length in the back (I added .25 inches all around for seam allowances) and then stitched this piece of fabric in place. Again it doesn’t have to be perfect as the piece will be mostly covered, which will not only hide the seams but also the fact the fabric wasn’t a perfect match.
I sewed on slightly overlapping rows of ivory lace over the entire fabric piece I added. Now my dress was floor length again even with my head starting at the waist (the length is important to not only help keep the dress historically accurate but also helps with the illusion). If not for the extra fabric my legs and feet would be showing, and it would be obvious how the costume worked. Plus it would just look goofy!
Fake arms
The bust has been made, dress altered, rig assembled, what is the costume missing? Oh yeah, arms!! The fake arms are needed to fill out the dress and will “hold” my real head to create the illusion that Marie’s head has been cut off and caught in her hands. I started with a pair of elbow-length white gloves Women's 22'' Long Satin Finger Gloves White Elbow Length 1920s Opera Bridal Dance Gloves For Evening Party Opera Costume, White, I put some craft wire 32.8 Feet Aluminum Wire, Wire Armature, Bendable Metal Craft Wire for Making Dolls Skeleton DIY Crafts(Silver, 3 mm Thickness) inside along with polyfil to shape each finger, and then I used 2 chopsticks along with craft wire to make the arms and filled with polyfill.
The gloves only went slightly above where the elbow would be, so I filled a pair of knee-high socks with a chopstick and polyfill to make the top half of the arms, then overlapped the gloves and sewed them in place together. I glued the top of the sock to the bust at the shoulder with a combination of e6000 (for a long permanent hold) and hot glue for a fast temporary hold until the e6000 dried.
I once again tried the costume on and arranged the hands how I thought they looked best, tightly under my chin and slightly overlapping with each other. I hand-stitched the gloves to each other and to the dress just below the hole.
With the craft wire in each finger I could really shape them however I wanted. I poured more of the nail polish over both gloves after stitching them in place. 
Arm Holes
At this point, the costume was mostly done, but I had a few observations when trying it on. First of all, I realized what a pain it was to never have the use of my arms. I realized how it would be impossible to eat or drink anything on my own and that bathroom trips would be difficult.
I needed a way to break the illusion when necessary and get my arms out. I decided to cut arm holes in the skirt for when I needed my arms but didn’t want the holes visible the rest of the time.
Then I had a brilliant idea! I would use the leftover pieces from the train I cut off to create flounces at the waist that would hide my arm holes. The rounded shape of the train was absolutely perfect!
I literally cut the extra piece in half, overlapped them slightly, and stitched them to the waist. They perfectly covered the holes I made for my arms and looked like an original design element of the dress (while still fitting the time period appropriately).
The second observation I had was when watching myself walk in the costume, I felt like I could see my legs hit the inside of the dress and the illusion was slightly disrupted, plus I have a larger chest and I could see my chest slightly under the skirt. I had spent so much time on this costume already that I wanted it to be absolutely perfect. I decided to buy a hoop skirt to wear under the dress and help fill out the skirt. Women Crinoline Petticoat A-line 6 Hoop Skirt Slips Long Underskirt for Wedding Bridal Dress Ball Gown White.
Securing dress to bodice
Once the costume was finished, I applied hot glue just inside the seam around the neckline to hold the dress perfectly in place on the bodice.
The Wig
The final piece needed to complete my look was the wig! I struggled to find a reasonably priced wig that I liked and ultimately ended up buying a white colonial man wig. Linfairy Lawyer Curly Wig Light Blonde Halloween Cosplay Costume Wig For Party

I undid the band in the back, scooped most of the curls to the top of the head, and pinned them in place. Marie Antoinette was known for her elaborate hairstyles so I knew I needed to add a few feathers and I folded some of the extra lace into a fan that I pinned with the feathers into the wig.
Makeup
On the night of the party, I started by doing my makeup. I used the palest concealer I had all over my face along with a very white heavy powder. I applied pink blush in large circles on my cheeks, drew my lips smaller, and used a red lip stain.
I kept the eyes simple to try and be more historically accurate (although I did wear a little mascara), and drew on a couple of fake beauty marks (FUN FACT Marie Antoinette didn’t have any moles but often used black patches to make them because they were stylish during the 18th century as women used them to cover smallpox scars….I have a bad chicken pox scar between my eyes, maybe we should bring this trend back to cover those).
Getting Ready to wear the costume
After my makeup was done I put on a wig cap to hold my hair. I just wore a tank top and shorts under my costume because it was warm the night of the party (I live in Alabama, where it is often hot on Halloween), but if you are in colder temperatures you can wear anything under the dress!
I then put on the backpack and slipped my head through the hole in the dress (I thought I would need help getting the costume on but surprisingly didn’t, the rig was super sturdy and I had no trouble putting this on alone).
With my arms through the arm holes, I put the wig on and used a few loose curls to help hide any trace of the hole my head was through.
Finally, I placed the hoop skirt on the ground in front of me, stepped into the hole, and then pulled the hoop skirt up to my armpits and tied it tightly over my chest. The costume was surprisingly comfortable! I could wear anything I wanted underneath including tennis shoes!
My body was free to move about under the skirt and when I needed I could pop an arm out. The whole thing felt very secure with the backpack and was very lightweight. The only thing that caused any discomfort was the wig got a little hot when dancing. 
I did win first place at our neighborhood costume party, and decided to wear it once more to a local brewery’s Halloween party where I won first place again!

It was so much fun to make and wear! I don’t know how I’m going to top it next year but I am already working on new ideas! The costume was sturdy and held up to multiple parties and still looks new. I don’t have the heart to get rid of her yet, so for now, she is propped up in my sewing room, hopefully, I can find a way to repurpose it again soon!
If you use this tutorial to make your own headless costume, I’d love to see pictures! Bekah Blakely-Savage shared her incredible Anne Boleyn costume she made using this tutorial and gave me permission to share the pictures with you! How amazing is this Henry VIII and Anne Boleyn couples costume? They won first place in their costume contest, obviously! 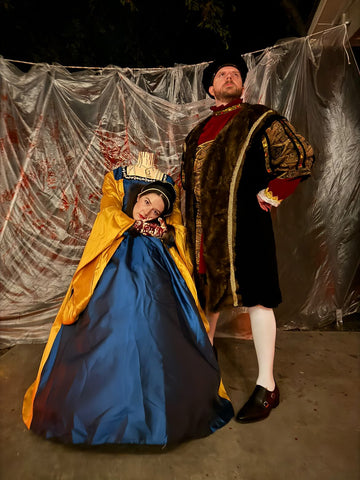
*I personally purchased every product that was used to make this costume and nothing was provided to me.
**I have included affiliate links to the products I used and can receive a small commission if a purchase is made after you click on a link in this tutorial.
MagpieTayleetot is a participant in the
Amazon Services LLC Associates
Program, an affiliate advertising
program designed to provide a means
for sites to earn advertising fees by
advertising and linking to Amazon.com.

4 comments
Thanks for the post Susie…. I’m 5.8" so a little tricky to pull it off. I didn’t have to make anything… i hired a big skirt, which i wore as normal and then used a huge kimono as the cloak, with a white shirt underneath… and then a matching dress linking the fake waist to my waist tied around my neck, just to cover the gab between my neck and big skirt… it worked. Would love to send pics!!!
Any chance you still have the costume and would be willing to sell it? I’d love to wear this at our neighborhood party this year but I have less than zero ability to make it.
Susie, I am standing in all of the pictures posted. I am short, only 5’1" and when taking pictures with other people, I did bend at the knees slightly and tilt my head to the side to help with the scale for pictures only. In all of the pictures where I am alone, I was standing completely up (like the picture above with the wine barrels behind me). Alternatively, if you are on the taller side, you can sit on a rolling stool under the hoop skirt like I did for this costume https://magpietayleetot.com/blogs/magpietayleetot-crafts-parties-and-more/my-magician-s-assistant-from-beetlejuice-costume-2022-costume-contest-winning?pos=13&_sid=1d831ebc2&ss=r and scoot around instead of walking!
in all of these pictures it looks like you are definitely kneeling on the ground. even the picture of the other woman who made a costume likeyours. can you send a pic of what it looks like when you are actually standing. unless you are 4 feet tall…then my apologies. great job!