My oldest daughter, Taylor, recently graduated from high school and I wanted to plan a big party to celebrate her! It had been years since she wanted a Birthday Party with all of her friends, so most of the parties I've thrown lately have been for her little sister. When she said she would like to have a graduation party, I knew I had to come up with something fun and create all the decorations and food for her party like I used to when she was little!
Party theme
We started discussing themes and looking for ideas outside of traditional school colors (red/black/white for her school) or black and gold grad themes. My daughter is super into music, Taylor Swift and Stevie Nicks to be exact.
During the planning phase of her party, she had concert tickets to see Stevie Nicks, and unfortunately, the concert was canceled due to an illness in the band the night before the show. She was devasted! She was also recently gifted a copy of the Daisy Jones and the Six Book, about a fictional 70s rock band. She has never read a book so fast and raved about it so much! 70s music and culture is definitely her jam! All the colors and flowers of that era remind me of her personality, so I decided we had to throw a Groovy Grad party!
Having a Taylor's Era's themed party was a close second choice. I still kinda wished I could have done both. My daughter's name is also Taylor and I could have separated sections of the party into her different "eras" (Disney Princesses, Cheerleading, Girl Scouts, Lacrosse, Music, ect). Maybe I should hold onto that idea for her future college graduation or bridal shower some day!
Party Decor
I came across this cute Groovy Grad set from Big Dot of Happiness. The colors were perfect so I ordered this set and used it as inspiration for the rest of the party.

Big Dot of Happiness also made this fantastic Graduation Photo Banner that matched the Groovy Grad theme. It had places to add 14 pictures (Kindergarten through 12th grade plus a graduation picture).

I ordered the banner and filled it with pictures of my daughter from every grade. It made a nice personalized decoration for the party.

The final piece of décor from Big Dot of Happiness I used for the party was the Door Hanger set. It came with 3 pieces, but I decided to separate them. I used the GRAD piece on my front door, but I hung the other 2 banners where some artwork normally hangs in my house, on opposite sides of our front window.

Peace Sign Balloon Garland
I knew I wanted a large balloon centerpiece for the party, and decided, what better than a big peace sign made of balloons!

I wrote a tutorial HERE if you want to make your own peace sign balloon garland! The giant peace sign made a great focal point for the party, and was a good location for my daughter and her friends to hold up the Groovy Grad photo booth props from Big Dot of Happiness!
VW Bus Photo Booth
I did make another photo booth for her party. I found this cute VW bus Photo Booth backdrop and already had a Backdrop Stand, so I hung it up and added another simple balloon arch around the outside. I always like having photo booths at parties, it helps me make sure I remember to take plenty of pictures and serves as a cute party decoration too!

Party Food
While shopping for decor for the party, I came across these Groovy Silicone Molds and decided to get them and make my own Groovy Candy Decorations! I used Candy Melts in orange, pink, white, yellow, blue and purple to make a bunch of candy decorations.

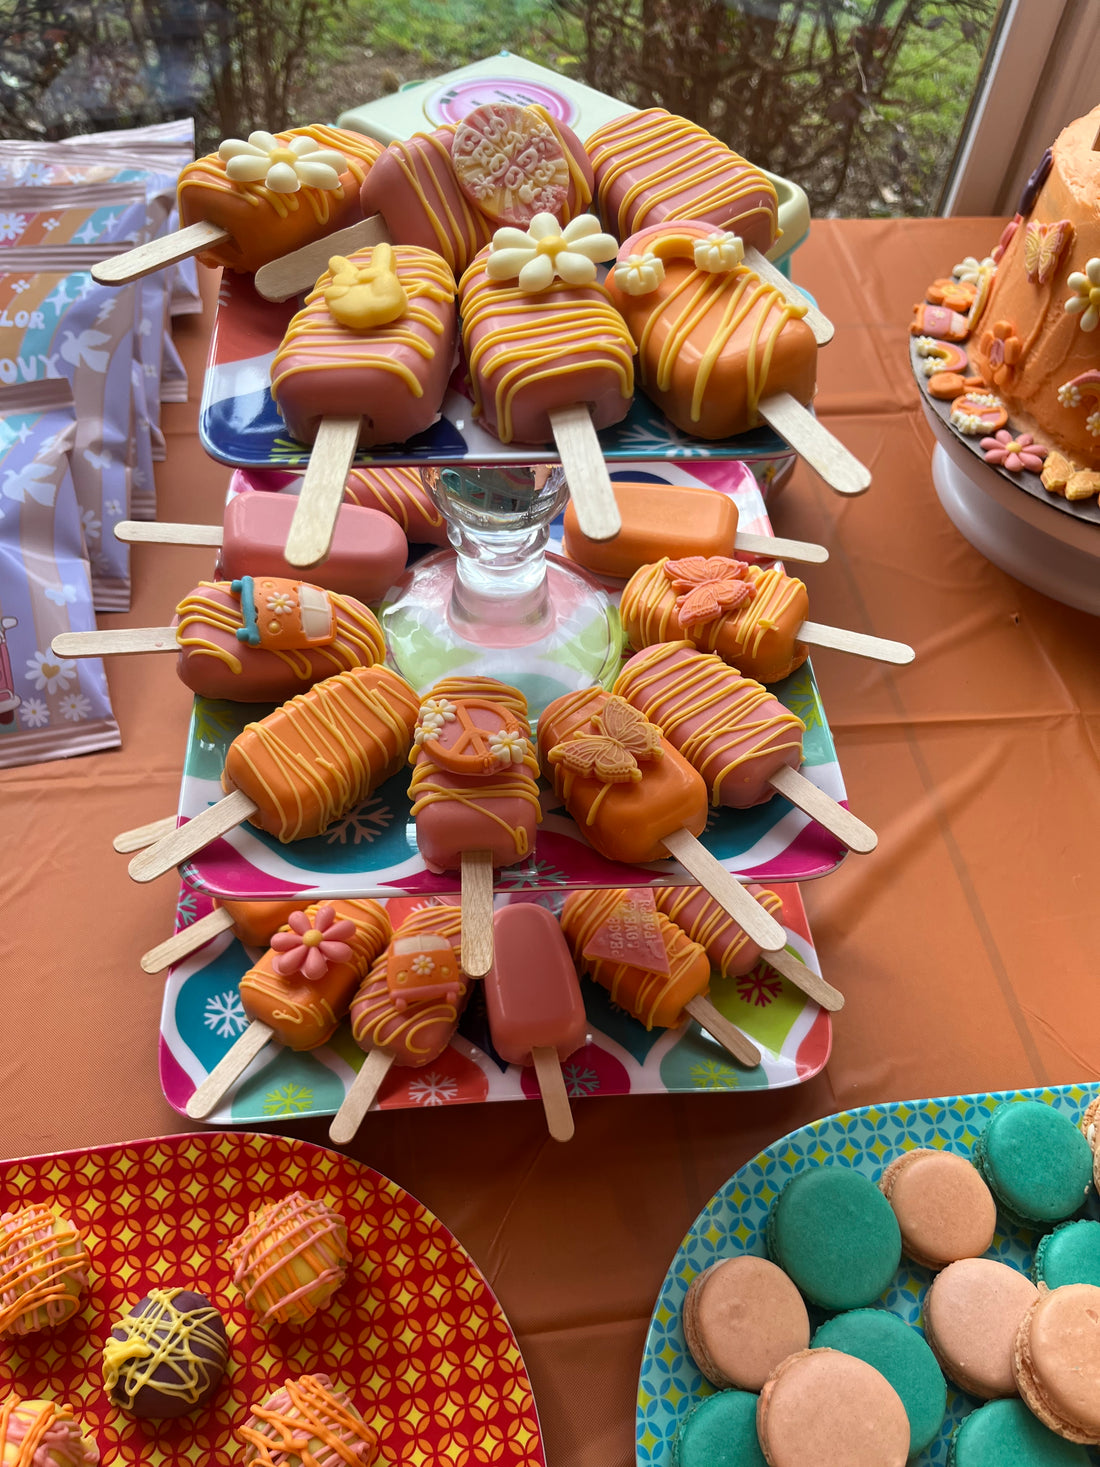
Cakesicles
The candy decorations were a little small for cupcakes (they would be perfect for mini cupcakes though). I decided to use them to dress up cakesicles! My daughters have always loved getting cake pops at Starbucks, and these cakesicles are like an oversized cake pop!
Supplies needed for cakesicles:
Food Grade Popsicle Sticks
Pre-baked cake (I used two 9 inch white cakes, but you can also use cake scraps after leveling a cake)
Buttercream icing (homemade or store bought).
Directions for cakesicles:
Step 1: Crumble pre-baked cake into crumbs.
Step 2: Add buttercream frosting a tablespoon at a time until the cake crumbs are moistened and sticking together. Just add enough icing to make the crumbs all stick together.
Step 3: Melt Candy melts for outer coating. Place candy melts in the microwave in a bowl and microwave at 30-second intervals until fully melted and smooth. Make sure you stir them every 30 seconds and only microwave until melted.
Step 4: Pour melted Candy melts into Cakesicle Molds and tip mold around to thinly coat all of the inside edges of each cavity. You can also use a paintbrush to coat the inside of each mold if you prefer.
Step 5: Insert a popsicle stick into each mold. You want to do this while the candy coating is still soft/wet, and you only want to insert it slightly (you will push it further in later).
Step 6: Place the silicone mold in the refrigerator for 5-10 minutes to help the outer coating to firm up.
Step 7: Remove molds from the refrigerator and fill the rest of the cavity with your cake mixture. Use your clean hands or a silicone spatula to press the cake mixture firmly into the mold.
Step 8: Gently push the popsicle stick into the cake mixture. You want it to be at least halfway into the mold.
Step 9: Cover the exposed cake mixture with more melted candy melts. Note: you may need to microwave your candy melts for 30 seconds more to re-melt them.
Step 10: If any excess candy melts dripped on the outer edge of the mold, wipe the mold clean.
Step 11: Place silicone molds back into the refrigerator for 10-15 minutes.
Step 12: Gently press on the bottom of the molds to release the cakesicle.
Step 13: Optional: Decorate the finished cakesicle. I drizzled another color of candy melt on the outside and pressed one of the candies I made into the drizzle. I left some undecorated, and some only decorated with drizzle to create a variety of different cakesicles.
These were a huge hit at the party. Everyone was asking why the popsicles weren't melting, and the kids who love a good cake pop really enjoyed these!

Cake
I am not the best cake decorator, but I am a great baker. I ordered this Peace Out Cake Topper from CamilasPaperCo on Etsy. I loved that she could personalize it to say Peace Out High School and my daughter's name and class of 23. I used all the extra candy decorations I made to finish off the cake.
My youngest daughter, loaned us her LOL Doll VW Bus to help decorate the food table, and it matched our colors and theme perfectly!

Cookies
I made a batch of Lemon Crinkle Cookies with this recipe from Two Sisters Crafting. Not only were they delicious but the colors looked great with the parties décor!

Oreo Truffle Balls
One of Taylor's favorite treats is Oreo Balls. I made a batch and used extra Candy Melts I had left over from the candy decorations and cakesicles so they would match the party's colors. I used this Oreo Truffle Recipe from Two Peas and Their Pod and substituted the colored candy melts for the chocolate and white chocolate wafers.

Macarons
The Macarons I made for the party weren't perfect! I definitely still need more practice, but Preppy Kitchen's Macaron Tutorial was easy to follow and they tasted delicious.

Groovy Chips
I had made a lot of sweet treats for the party and needed to add a few non-sugar items. First up, I decided to make some custom chip bags to match the party's theme! I wrote a tutorial on Making Your Own Chip Bags if you are interested in making your own!
I couldn't believe how easy these were to make, and they look much nicer than store-bought chip bags sitting on the party food table!

Charcuterie Letters
I had wanted to fill these letters Spelling GRAD and/or numbers of 2023 with Charcuterie, but unfortunately, neither Amazon nor Hobby Lobby had the complete set for either available the week before the party. Instead, I opted to go with TAY, Taylor's nickname. Using the Fillable Letter Boxes was a fun way to display charcuterie!

Fruits and Veggies
To add a few healthier options to the food table, I cut up some fruit into fun shapes with my Melon Baller and Small Cookie Cutters. I also added some cute veggies to a round platter in the shape of a peace sign.

I made a Cucumber Dip recipe from Meatload and Melodrama to serve with the cut veggies. My daughter also likes to dip potato chips in this dip!

Pizza
I completely missed getting pictures of the pizza we ordered, but opted to serve pizza for dinner with the phrase, "Have a PEACE of Pizza"

Groovy Grad ended up being the perfect alternative Graduation Party theme for my daughter! My youngest daughter also loved the theme and says she wants a Groovy Party when she graduates too...maybe we will throw her a "Peace Out Single Digits" party in a couple of years for her 10th Birthday!
*I personally purchased every product that was used to make this costume and nothing was provided to me.
**I have included affiliate links to the products I used and can receive a small commission if a purchase is made after you click on a link in this tutorial.
MagpieTayleetot is a participant in the
Amazon Services LLC Associates
Program, an affiliate advertising
program designed to provide a means
for sites to earn advertising fees by
advertising and linking to Amazon.com.