

Supplies Needed
Before we get started, let's gather the materials required to create this mesmerizing neon dance floor:
1. Neon Poster Sheets 11x14 (I used 30 11x14 inch sheets, and used the extras for other party decorations, but you can use as many or as few as you'd like)
2. Black electrical tape (I ordered 2 rolls of 3/4 inch tape, but only needed 1 roll, if I had gone any larger I would have needed a second roll)
3. Clear Contact Paper (I used just under 2 rolls)
Assemble the Dance Floor
I assembled the dance floor a week before the party to save time on the day of the event. I did need to transport this dance floor in my car, but it was easy to bend in half to fit in my car and didn't leave any creases when I took it out of the car and set it up.
Start by arranging the pieces of poster board how you would like them. Decide if you want a pattern, or just randomly placed. Determine how large you would like your dance floor to be.
Once all your poster boards are laid out in the position you want them, add a small X out of electrical tape everywhere that 4 squares of poster board meet. It doesn't matter how this looks, this won't be visible on your final dance floor. This is just to hold the poster board in place.

After you have added tape to everywhere 4 pieces of poster board connect, go around the outer edge of your dance floor and add a small strip of tape to keep the outside edges of the poster board together.
Now that all the poster boards are secured together, flip the entire dance floor upside down. You will no longer see the X's you have taped on. Using the electrical tape, run a long line of tape from one side of the dance floor to the other, covering every seam where two poster boards meet. Go slowly and press the tape firmly to each seam keeping half the tape on each neighboring poster board. Repeat this process until every seam length and width way has been covered with electrical tape.
After adding the electrical tape, your dance floor will look great and appear ready to use. The poster board on its own won't hold up to people walking on it, it would quickly show dirty footprints or rip. To protect your dance floor and give it a nice smooth shine, you want to apply clear contact paper on top.
Starting in one corner of your dance floor, begin to unroll the contact paper backing. Press the contact paper directly onto the poster board and slowly unroll it while using your hands to smooth out any air bubbles. When you reach the opposite corner of the dance floor, use scissors to cut the contact paper from the roll. Repeat this process until your entire dance floor is covered. Overlap each new row of contact paper slightly, and slightly overlap the outer edges of your dance floor. Once you are finished you can tuck the slight overhang to the underside of the poster board.
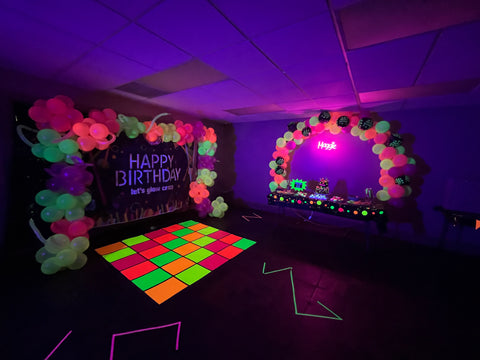
That's it, your dance floor is ready for dancing! Our glow party was a pool party, and this dance floor was still in perfect shape at the end of the night, even with a bunch of wet kids dancing all over it!
Our dance floor helped light up the room and was perfect for photo booth pictures! 
Creating a neon dance floor for your kids' glow party is a fantastic way to add an extra layer of excitement and fun. With a little creativity and some basic materials, you can turn your party space into a mesmerizing dance floor that will leave a lasting impression on your young guests. So, put on your dancing shoes and get ready to glow!
Be sure to check out my Glow Party Comprehensive Guide to find lots of decor and recipe ideas that would be perfect for your next Glow Party!
**I have included affiliate links to the products I used and can receive a small commission if a purchase is made after you click on a link in this tutorial. All items used in this tutorial were purchased by me and I did not receive anything in exchange.
MagpieTayleetot is a participant in the
Amazon Services LLC Associates
Program, an affiliate advertising
program designed to provide a means
for sites to earn advertising fees by
advertising and linking to Amazon.com