

Photo booths have become a staple at events, adding a fun spot to capture memorable moments for guests. I make one for every party I host. Not only do they serve as a large piece of decor for the event space, but they also serve as a perfect reminder for me to get a picture of everyone in attendance.
I always want a backdrop that suits the event's theme and captures the essence of the occasion. Sometimes I use props like the coral reef I built for this Under the Sea Photobooth. Sometimes I will sew ruffle crepe paper streamers like I did for this Ruffled Streamer Luau backdrop. Other times I find a great pre-made backdrop on Amazon like I used for this Blacklight Glow Party Photo Booth. I try to mix up the style backdrops I use since I frequently invite the same guests and don't want my photo booths to look "cookie cutter".
Fringe backdrops, made from plastic tablecloths, like I am using in this blog post, are a great way to make your own backdrop very inexpensively and can be custom-made to match any party theme or colors! In this comprehensive DIY guide, I will show you how to create an eye-catching photo booth backdrop using plastic tablecloths. Following these steps, you can design a vibrant and versatile backdrop that will leave a lasting impression on your guests.
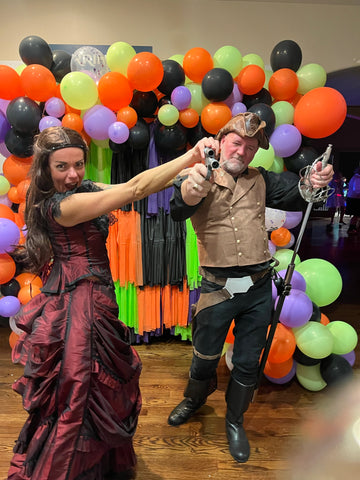
I created this backdrop for our neighborhood's annual adult Halloween party and just used an assortment of Halloween colors, orange, black, lime green, and purple. My finished photo booth was approximately six and a half feet tall by 8 feet wide, but you can easily scale this up or down to fit your size needs.
Materials Needed:
Rectangular Plastic Table Clothes in a variety of colors - I used 12 tablecloths in total for my 6.5 feet tall by 8 feet wide backdrop.
Scissors or a Rotary Cutter
Backdrop Stand or Command Hooks
Optional:
Step 1: Select your color palette
The first step in creating your DIY photo booth backdrop is to choose a color palette that aligns with the theme and colors of your event. Plastic tablecloths come in a wide variety of colors, giving you the flexibility to match your backdrop with any occasion. For my fringe backdrop, I selected 4 Halloween colors, orange black, lime green, and purple.
I found Hobby Lobby's selection of plastic tablecloths to be more vibrant than Dollar Tree's, and now that Dollar Tree has raised their pricing to $1.25, Hobby Lobby's $1 tablecloths are also the better value! I purchased 4 tablecloths in each of my 4 chosen colors, for a total of 16 table clothes. While assembling, I realized I had more than was needed and only used 12!
Step 2: Measure and cut
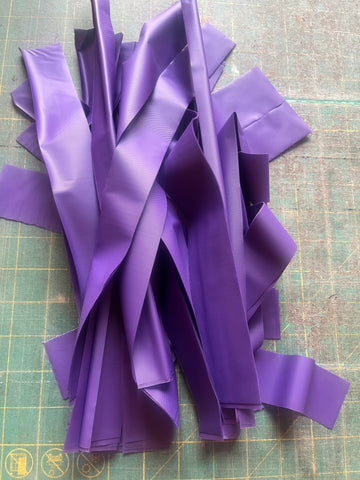
Lay out the plastic tablecloths on a flat surface and start by measuring and cutting the tablecloths into strips. To achieve a lush and full backdrop, I recommend cutting strips that are 1.5 inches wide and approximately 4.5 feet long. The uniform width of the strips will help maintain consistency in the backdrop's appearance, but don't feel like you have to be too exact, if the strips are close in size, you won't be able to tell they are exact once they are all hung together.
This process is much much quicker if you use a Rotary Cutter to cut your strips. I unfolded the tablecloth lengthwise and left it folded width-wide to cut my strips. The width of the tablecloth was double folded, like it comes in the package, when I started cutting 1.5-inch strips across the length of the plastic tablecloth. This left me with strips that were one and a half inches wide by four and a half feet long when unfolded.

Repeat this process until you have a large pile of strips. You can cut all of your strips at once, or rotate back and forth, between cutting and tying your strips. Even using a rotary cutter, my hands got tired after cutting a bunch of strips, so I rotated and only cut a little over half a table cloth at a time.
Step 3: Tie Strips to Twine
Many people make fringe backdrops using Plastic Fencing, but I find it more tedious to tie the fringe strips through the fencing holes, and twine is much cheaper than plastic fencing. Using twine instead helps make this a budget backdrop!
If you are setting up your backdrop at home, you can go ahead and tie a long piece of Butchers Twine to both sides of your backdrop stand. In my case, I was prepping the backdrop at home and would be attaching it to the stand at my neighborhood clubhouse the following weekend. Instead of setting up the backdrop stand just to work on the fringe backdrop, I just tied an extra long piece of twine between two of my dining room chairs and placed the chairs the same distance apart as my backdrop stand, approximately 8 feet apart.
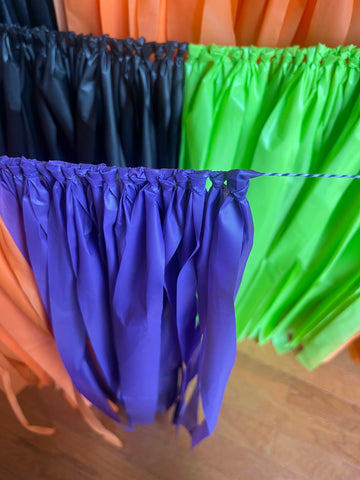
I took one strip of the cut tablecloth at a time and folded it in half, making a loop at the fold. There is a natural crease in the tablecloth at the halfway point due to how it is folded in the package.
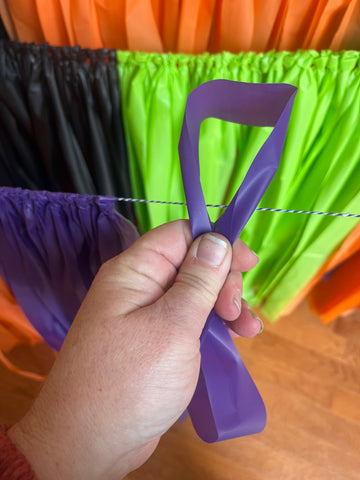
I held the loop directly in front of the twine. Next, I pulled the two tail pieces from the bottom of the loop behind the twine, and then over the twine, going through the inside of the loop. 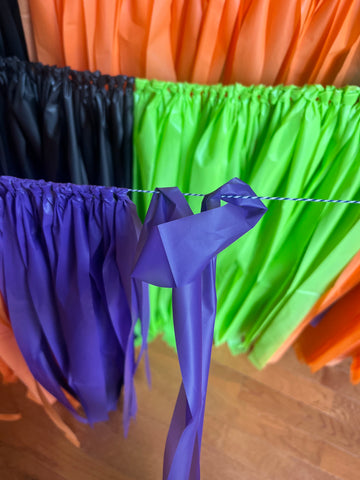
This created a loose knot on the twine. If you pull down on the tail pieces, the knot will tighten, but you can still slide the strip of tablecloth along the twine.
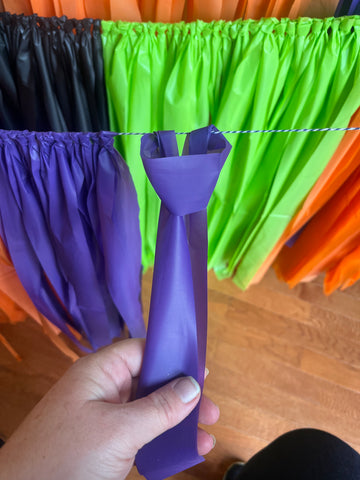
Repeat this process of making a loop and tying knots until you have as many pieces of one color as you'd like tied to the twine. Once you have a bunch of knots, you can slide them closer together to create a very full fringe.
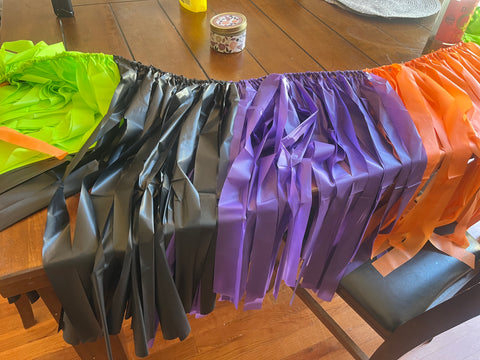
After you have all the strips tied of one color, repeat the process of cutting strips and tying them to the twine from your next color. You can add as many or as few colored sections as you would like to each piece of twine.
Once I filled the entire width of the twine, I tied a second piece of twine to the same chairs. and worked on filling it. Adding the second piece of twine directly in front of the completed strip gave me an idea of how wide I wanted each color section to be and reminded me what colors were where so I could make sure the same color wouldn't appear directly above or below the other fringe strip.
In total, I made 4 strands of fringe on twine that were 8 feet wide and just over 2 feet tall. I untied each end from the chair, and then tied a loose loop on the end of each strand so the tablecloth knots wouldn't slip off during transport.
Step 4: Attach fringe to backdrop stand
On the day of the party, I just had to set up my Backdrop Stand and attach the four strands of fringe. I started by tying each end of the bottom strand of twine to the bottom of my backdrop stand. I selected a position that would have the bottom of the fringe just above the floor. I continued tying on the additional three layers of fringe, overlapping the layer below slightly each time.
The weight of the fringe causes the twine to dip slightly in the center. To prevent this, I tied a couple of 260 balloons to the top of the backdrop stand and secured them to the center of the butcher's twine for each of the three lower tiers. This is optional, and you don't have to hang your tiers straight and even. In fact, I think it would look great to intentionally make several tiers at an angle, or even cut some of the colors shorter once hung. For the top tier, I attached the twine to the top of the stand using the clamps that were included with my backdrop stand. I planned to add a balloon garland around the fringe backdrop and knew the balloons would hide the clamps.
I added a few glue dots to the backdrop stand just below where I tied each strand. The strands appeared to be holding in place where I tied them, but I wanted to make sure they didn't slip down during the party. The glue dots are easy to remove from the stand later and add an extra level of security.
If you do not have a backdrop stand and don't want to purchase one, you could hang the fringe using a series of command hooks attached to the wall, I would recommend at least 3 command hooks per tier of your fringe garland.
Step 5: Add extra elements
To add a personal touch to your DIY photo booth backdrop, consider incorporating extra elements such as balloons, paper flowers, or string lights. These additions can enhance the overall aesthetics of your backdrop and make it even more inviting for photos. I decided to add a balloon garland around the outside of my photobooth. I used two of these Halloween Balloon Garland Kits to complete my photo booth. The balloons helped hide all the edge of the backdrop stand and added a lot of dimension!
Step 6: Capture the Moments
Once your DIY photo booth backdrop is set up and ready to go, make sure to have a camera or smartphone ready to capture all of your guests. I always make a point to take a picture of everyone when they arrive or as they are leaving.
Whether it's a wedding, birthday party, or holiday party, your customized backdrop will provide the perfect backdrop for countless photos and lasting memories.
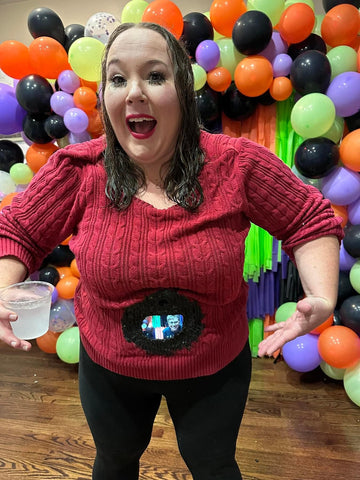
At our party, the main room was dark and set up for dancing, but having this backdrop in the front entrance provided a perfect spot to get a good picture of everyone in their costumes! I love that you can even see the fringe backdrop in the hole in my stomach here, along with the friend who was behind me!
Save for future events
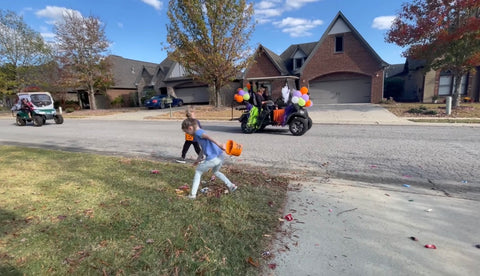
The fringe holds up surprisingly well for being so inexpensive, and can definitely be saved for a future event! The morning after our party, our neighborhood held our annual witches' ride. A bunch of ladies dress up as witches, decorate our golf carts, and throw candy at children. I spent so much time prepping for the adult Halloween party, that I hadn't made decorations for our golf cart. Instead, I just repurposed the fringe backdrop and some balloons to decorate our ride! Even driving around the fringe is fully intact!
Conclusion
Designing a photo booth backdrop using plastic tablecloths is not only cost-effective but also a creative and easy DIY project. Your personalized backdrop will add a unique touch to your party and provide a great setting for photos. Your guests will appreciate the thought and effort you put into making your event memorable with this simple but effective addition. Get ready to capture memories and let your creativity shine with your own plastic tablecloth backdrop. No matter the event, your DIY photo booth backdrop will be a hit!
**I have included affiliate links to the products I used and can receive a small commission if a purchase is made after you click on a link in this tutorial. All items used in this tutorial were purchased by me and I did not receive anything in exchange.
MagpieTayleetot is a participant in the
Amazon Services LLC Associates
Program, an affiliate advertising
program designed to provide a means
for sites to earn advertising fees by
advertising and linking to Amazon.com.