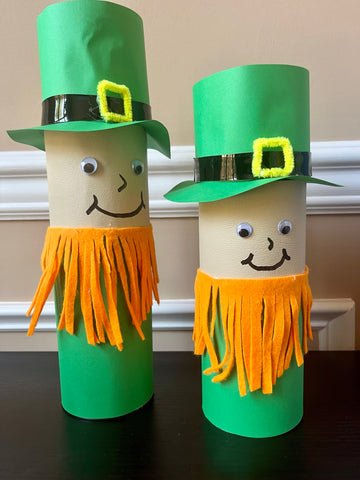
St.Patrick's Day Upcycle - Turning a Pringles Can into a Leprechaun
As a classroom mom gearing up for St. Patrick’s Day, you're likely on the lookout for fun and creative snack ideas to celebrate the occasion. Look no further! In this blog post, I'll share a simple yet adorable DIY project: turning a humble can of Pringles into a charming leprechaun, perfect for delighting kids and adults alike. This is a fantastic way to turn a store-bought snack into something festive, without cooking! The can may be saved afterward, leaving you with a cute piece of classroom decor to use year after year in March!
Our class was having a small party for St.Patrick's Day, and my daughter's teacher gave me a list of green foods she would like for the snack. It included: green M&Ms, green fruit, sour cream and onion chips, green Jello, and some Lucky Charms. I knew the kids would love those foods, but I thought they would like them even more if I made them all cute.
I quickly had lots of ideas for how to make most of the foods cute, I had done Shamrock Rainbow Fruit Kabobs a year prior, so I knew I could get lots of different green fruits and make kabobs again. Fruit is way more fun on a stick! I used Kiwi, Green Grapes, Pears, Green Apples, and honeydew melons to make all green fruit kabobs!
I decided to do the green M&Ms and Lucky Charms in treat bags with printed bag toppers.
I turned the green Jello cups into Leprechaun Hats with some cardstock and pipe cleaners.
The only snack I had trouble figuring out how to make cute were the Sour Cream and Onion chips. I knew chips didn't repackage well, but had considered printing new chip bags and wrapping individual chip bags in a cute St.Patrick's Day package. I knew that was a bit time-consuming, and required a lot more printer ink, so I continued to think of other ideas. I do have a Tutorial for making your own chip bags, if you want to make your own, but I decided with all the other snacks I was prepping, that I needed something a little faster! Then it hit me, Pringles brand also makes sour cream and onion chips! I could decorate the canisters to look like leprechauns!
Materials Needed:
Can of Pringles (Our teacher requested Sour Cream and Onion, but any flavor will work)
Green construction paper or cardstock
Black and flesh colored cardstock or other material (I was out of flesh colored paper and used some flesh colored Faux leather I had on hand)
Yellow pipe cleaner
Hot Glue
Scissors
Black marker
Round Cookie Cutter or other circle to trace
Step 1: Prepare Your Materials
Gather all your materials in one place to make the crafting process smooth and enjoyable. The supplies listed here make 1 decorated pringle can, I made 3 leprechauns total for our class of 20 kids. Pringles come in standard-size cans as well as larger party-size cans. Either will work for this project, I used both so that each leprechaun friend looked a little different! Open the can of Pringles, remove the foil seal, but place the lid back on top (this way you can open the can and get the chips out after crafting on the can, the foil piece is tricky to remove with the hat in place).
Step 2: Craft the Leprechaun's Face
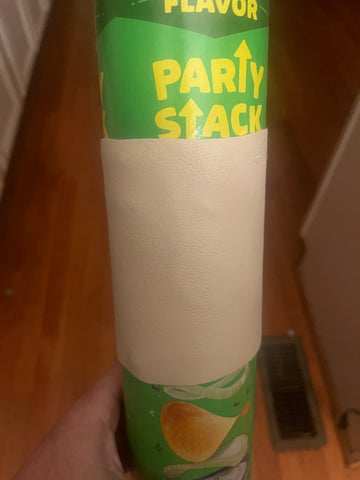
Using cream flesh-colored paper or Faux leather, cut a strip that can wrap around the can, and glue it in the center of the Pringles can. Leave enough room for the hat above and the beard below. Use hot glue to hold the paper or fabric in place. Using Faux leather for the face worked well because it is much thicker than paper and created a natural lip for the hat to sit on. Attach 2 googly eyes with glue and draw a nose and mouth with a black marker.
Step 3: Create the Leprechaun's Hat
To create the hat, you want to first make the brim. Take your green cardstock and use the round cookie cutter to trace and cut out circles to serve as the brims of the hats. I used the 4.1 inch circle from my favorite Circle Cookie Cutters set.

I then placed the pringles can in the center of the circle and traced around the outside of the cup. I poked a hole in the center of this circle, and then cut to the traced line to cut out the inner circle.

The brim is now ready to attach to the Pringles Can! Slide the brim down the top of the can until it meets the face fabric/paper. If you used paper for the face, you will likely have to glue the hat brim in place. If you used Faux leather, like I did, it is thick enough the brim will sit in place on top of it.
Measure and cut a strip of green paper that will wrap around the top of the Pringles can, forming the leprechaun's hat. This strip should be long enough to wrap around the can, and as tall as the distance between your cream fabric/paper and the top of the can. Secure the strip with glue. Next, cut another strip of green paper and cover the can below the face. The beard will cover most of this paper, but this will serve as the leprechaun's clothes.
Next, you want to decorate the hat, add a strip of black paper and a belt buckle made from yellow pipe cleaners to the hat. To make the belt buckle I cut each yellow pipe cleaner into four equal pieces.
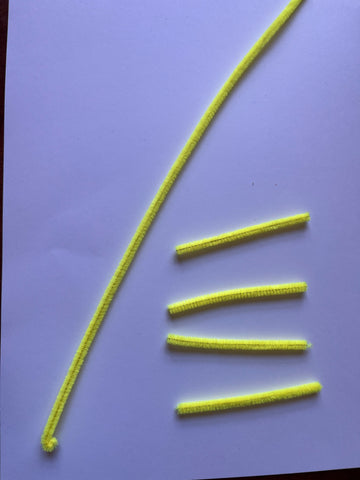
I then folded each smaller piece in half.

Then folded those pieces in half once more to make a square shape.

Step 4: Add the Leprechaun's Beard
Cut out a strip of orange felt that is long enough to wrap around the can and wide enough to create the length of beard you want, I'd advise cutting it longer than you think it should be and trimming it once it is in place. Cut thin strips all the way across this strip, but don't cut through the top. This will create hairs for the beard but allow you to glue it in one piece. Glue the beard in place beneath the leprechaun's mouth (just a thin line of glue to hold the top of the felt piece), allowing it to overlap with the leprechaun's clothes. Once it is glued in place, you can trim the strips to create the look of a beard. I made the strips longer in the center and shorter on each side. 
Step 5: Finishing Touches
Optionally, you can add additional embellishments such as a shamrock or gold coins made from paper to enhance the festive vibe.
Voila! You've transformed a simple can of Pringles into an adorable leprechaun snack perfect for celebrating St. Patrick's Day in style. Display your creations proudly at your child's classroom party or enjoy them as a fun activity to do together at home. Carefully wipe out the can after the chips have been eaten and save your leprechaun for decor! Happy crafting and Happy St. Patrick's Day!
Check out some of the other St.Patrick's Day Snacks I made here:

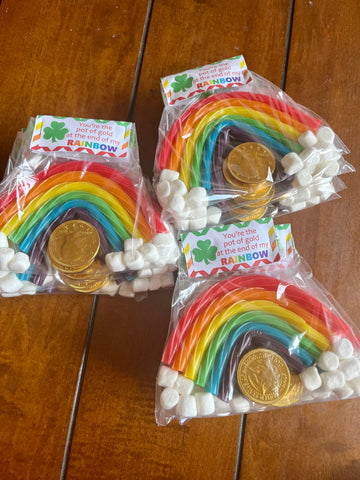
Pot of Gold at the end of the Rainbow
And if you want help making Leprechauns or Leprechaun traps, check out my Class Leprechaun Trap Tutorial! 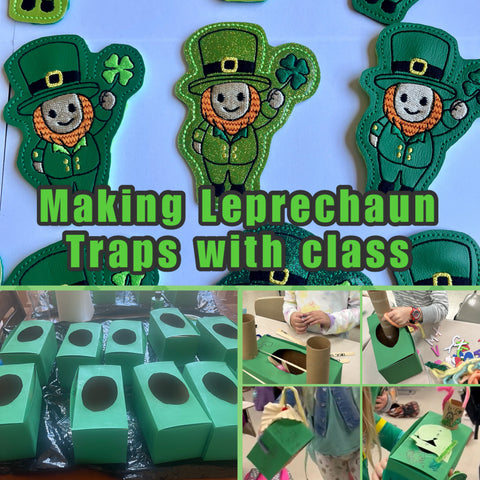
I'm working on more fun St.Patrick's Day class projects for this year, so stay tuned!
**I have included affiliate links to the products I used and can receive a small commission if a purchase is made after you click on a link in this tutorial. All items used in this tutorial were purchased by me and I did not receive anything in exchange.
MagpieTayleetot is a participant in the
Amazon Services LLC Associates
Program, an affiliate advertising
program designed to provide a means
for sites to earn advertising fees by
advertising and linking to Amazon.com.